Integrate external data
This guide explains how to connect Rational AI to external platforms (such as Google, AWS, or OpenAI) and synchronize their data using connectors and sources.
The process consists of two steps:
- Create and authorize a connector to access an external provider;
- Define a source that uses the connector to retrieve data.
Both steps are required for the platform to securely access and synchronize external content.
Establishing the connector
Connectors handle authentication and permissions for external services. To manage connectors open the Settings and navigate to Connectors from the left-hand sidebar.
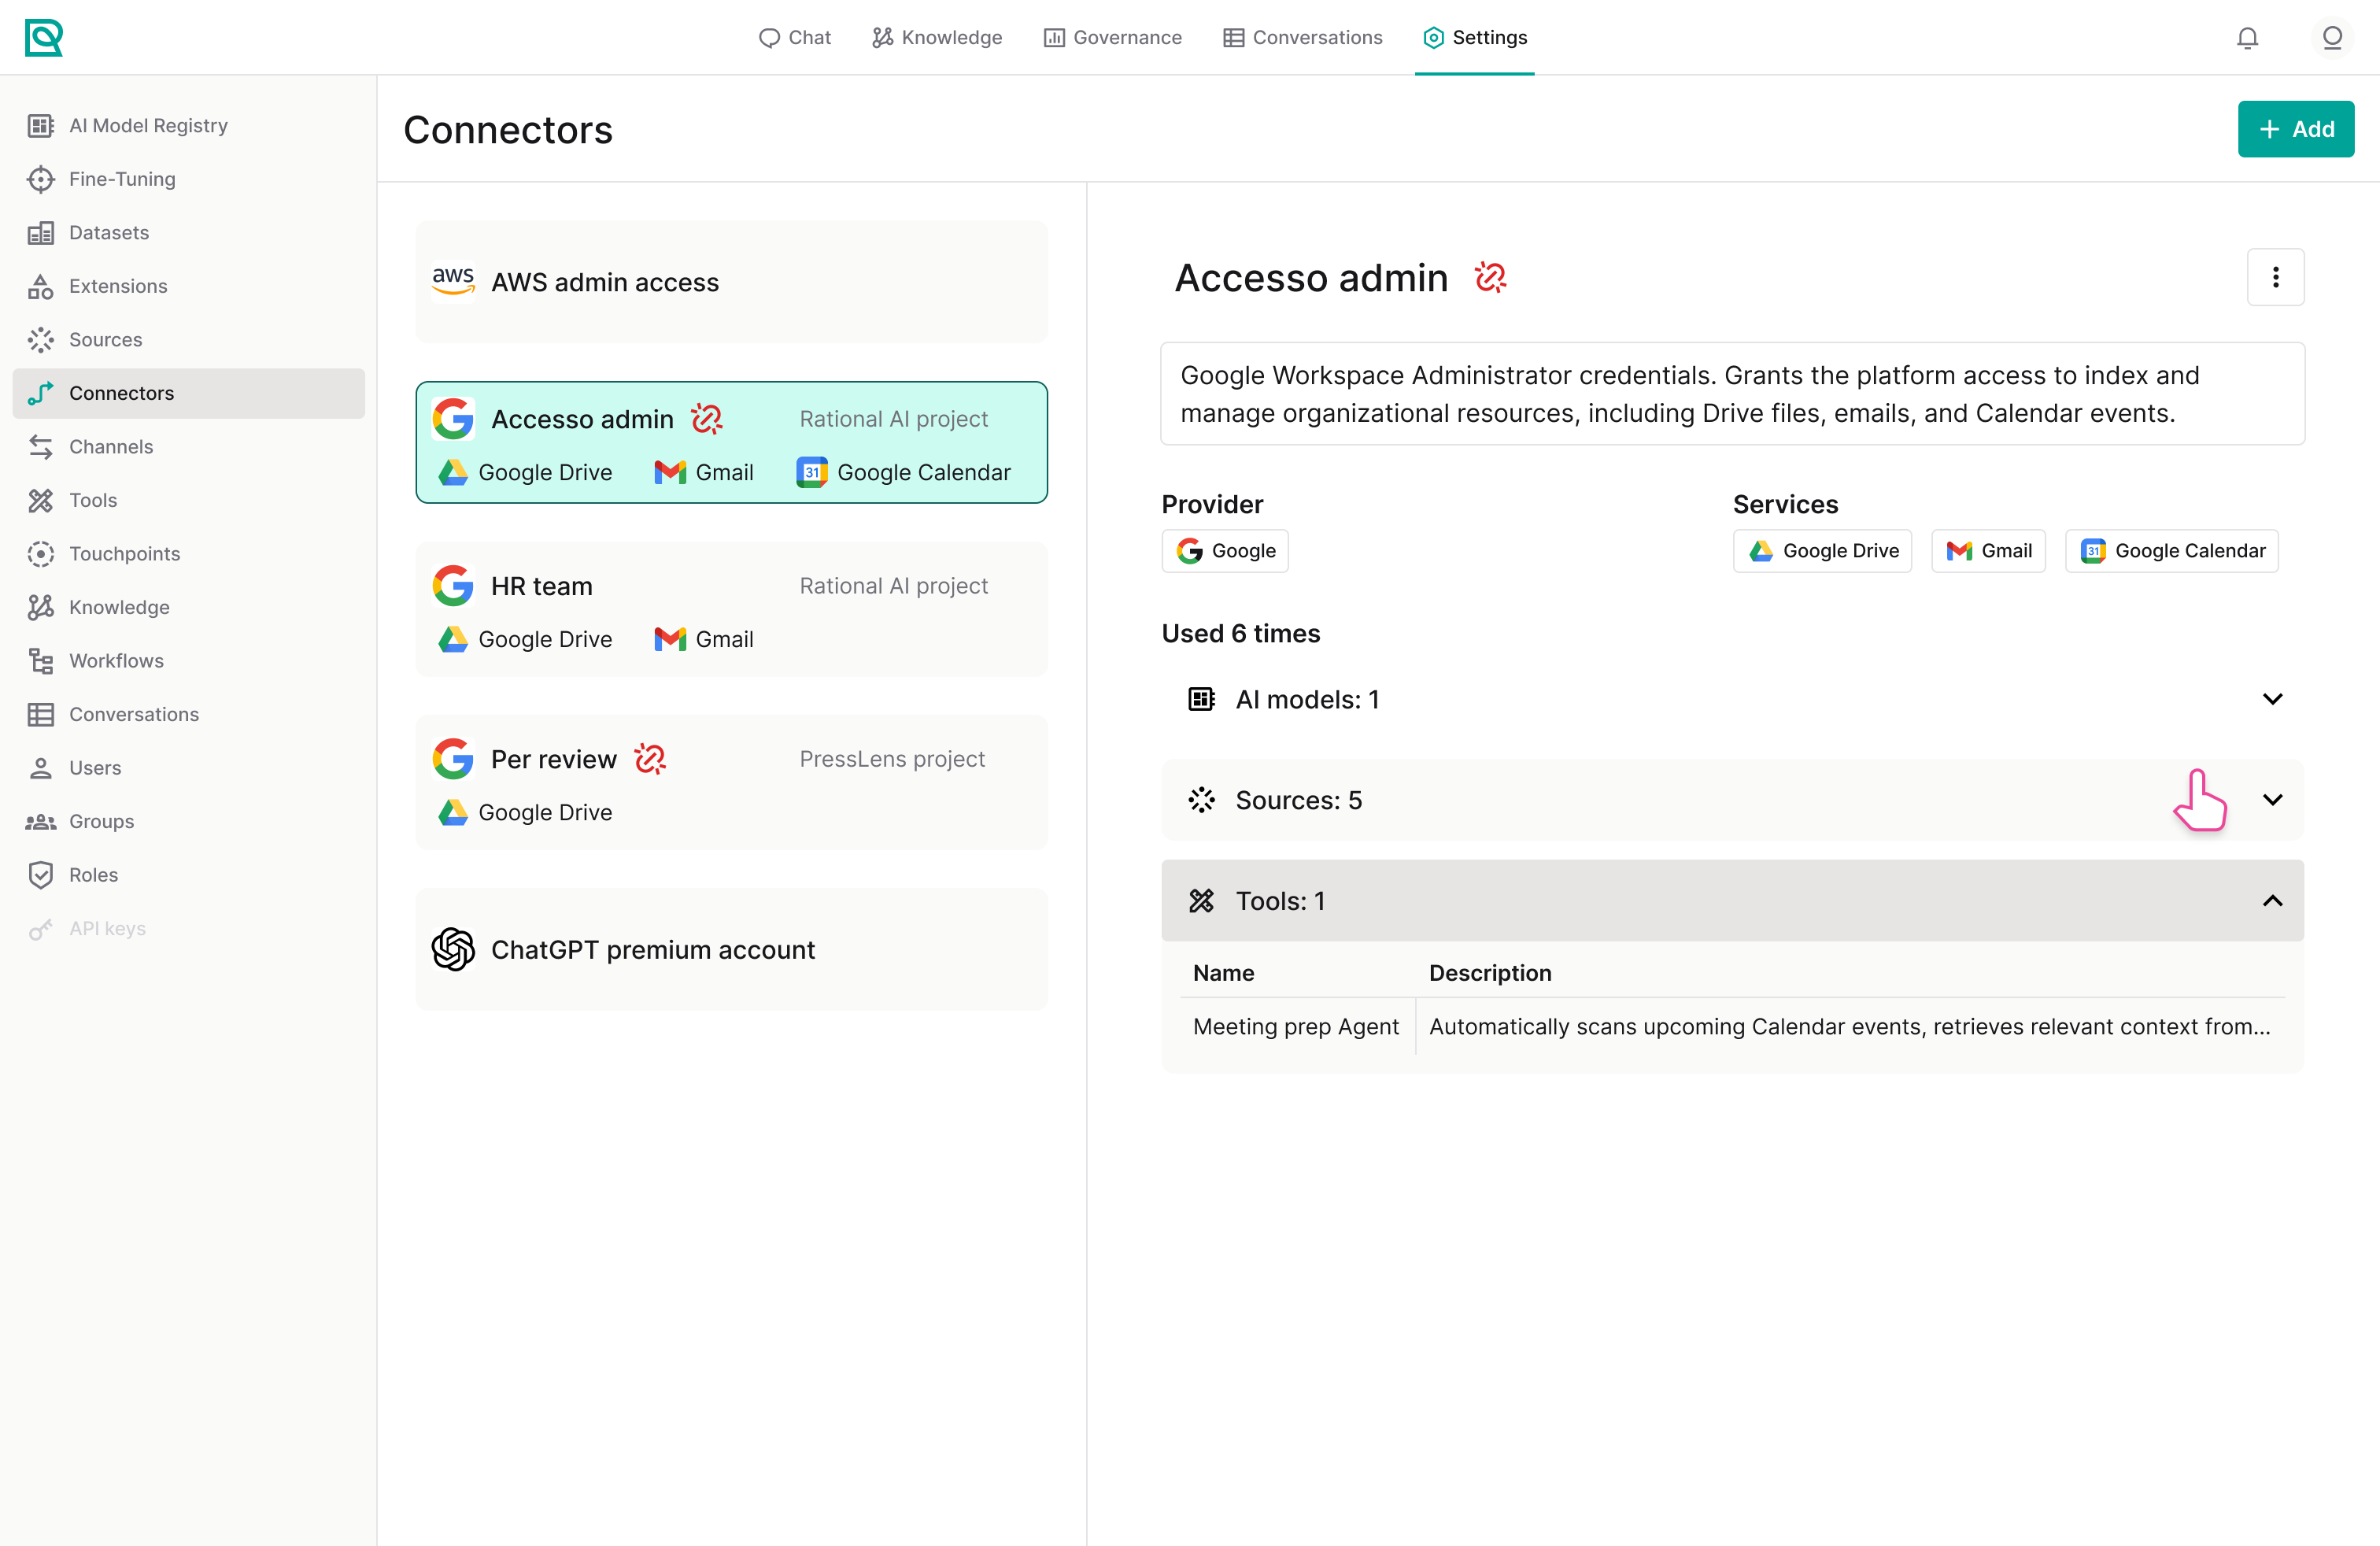
The connectors page is divided into two sections:
-
Left panel: a list of all configured connectors.
-
Right panel: details of the selected connector, including:
- Name and description
- Provider
- Next scheduled synch
- Usage by AI models, sources, and tools.
Some providers (for example, Google) also display enabled services and linked projects.
Creating a new connector
If no connectors are configured, the page will be empty. To start, simply click the + Add button and select a provider from the available catalog (e.g., Google, AWS, OpenAI). Each provider has specific authentication requirements. Some providers require only an API key, while others, such as Google, use a full OAuth authorization flow.
Each configuration modal includes a link to a guide for obtaining the required credentials.
After selecting a provider, you will be presented with a configuration form. You must provide:
- A name (e.g., Admin Google access);
- A description, optional but strongly recommended for long term maintenance and team collaboration;
- Credentials obtained from the provider (key, tokens, or OAuth configuration); When finished click Add. The connector will appear in the list on the left.
Some providers require additional configuration steps or authorization flows. Consult the provider-specific guides to learn how to add each one from start to finish.
Authentication issues
If authentication fails or permissions are incomplete, a red broken-link icon  will appear next to the connector name.
To resolve the issue:
- Open the connector’s option menu;
- Select Complete authentication;
- Repeat the authorization process.
Always resolve authentication errors before creating sources.
Adding a data source
Once a connector is active, you can define one or more sources to specify which data should be retrieved and synchronized. Navigate to Sources in the left-hand sidebar and click the + New button.
Creating a source
In the source creation form, provide the following information:
-
A name (es. Marketing assets 2024);
-
A description explaining the content and purpose for long term maintenance and team collaboration;
-
Select the source type (es. Google Drive);
-
Choose a compatible connector and pick the one created in the previous phase.
Because the connector is already authenticated, the system will allow you to browse available resources. Select the folders you wish to synchronize.⚠️WARNINGIf a connector with authentication issues has been selected, it won't be able to access external data and no folder will be available for selection. Return to the Connectors page and re-authenticate before continuing.
-
Click Add to confirm.
Configuring synchronization settings
By default, new sources are created with manual synchronization. You can freely change this from the Synchronization settings (available in the  options menu).

You can choose between two modes:
- Manual: synchronization only occurs when triggered manually.
- Periodic: data is synchronized automatically at scheduled intervals.
For periodic synchronization, you can define a schedule, such as: every number of minutes, every hour, once a day, once a week, once a month.
Choose a frequency based on how often your external data changes.
You must also define how deletions are handled:
- Cascade delete: files deleted from the original source (e.g., from Google Drive) are also removed from the Rational AI.
- Keep: deleted external files remain stored in Rational AI.
Integrate AWS data
To integrate your application with Amazon S3, you must first establish a secure connection. This is done by generating a pair of security credentials (keys) that act like a username and password for your automated processes.
Generate IAM Credentials
Before configuring the connector, you need an Identity and Access Management (IAM) user with the correct permissions.
- Sign in to the AWS Management Console and navigate to IAM Dashboard > Users.
- Create a new user:
- Click Create user.
- Under Permissions options, select Attach policies directly.
- Search for and check
AmazonS3FullAccess(or a more restricted policy if required).
- Create Access keys:
- Click username of newly created user.
- Security credentials > Access keys and click Create access key.
- Select
Application running outside AWSas the use case.
- You will see your Access Key ID and Secret Access Key. Download the
.csvfile
The Secret Access Key is only shown once. If lost, you must delete the old key and create a new one.
Configure the connector
Now that you have your credentials, set up the AWS connector in Rational AI.
- Navigate to Settings and select Connectors from the left sidebar.
- Add a new connector: Click the + Add button and select AWS from the list of available providers.
- Fill out the configuration form:
- Name (e.g., S3 Access for Marketing Data).
- Description (optional but strongly recommended).
- Access Key ID: paste the public key generated in Step 1.
- Secret Access Key: paste the private key.
- Click Add to save and activate the connector.
The AWS S3 connector is now ready for use. You can link it to specific buckets in the next step.
Configure the AWS S3 source
After configuring the connector, you need to define the source to specify which S3 buckets should be synchronized.
- Navigate to Sources and click + New.
- Select the AWS connector you created earlier.
- Fill out the source form:
- Name (e.g., S3 Log Bucket).
- Description to explain the content.
- Source type: select
AWS S3. - Specify the AWS region where the bucket is located (e.g., eu-central-1).
- S3 Endpoint is usually
s3.amazonaws.comor a region-specific endpoint.
- The system will allow you to browse the S3 buckets accessible via the selected connector:
- Select the buckets and, optionally, define specific prefixes/paths within those buckets that you wish to include in the synchronization.
- Click Add to create the source.
This source, like all sources, is created with manual synchronization by default. Check the Synchronization settings section to learn how to update them.
Integrate Google Drive data
This procedure is essential to allow your application to securely access Google services (such as Drive, Calendar, or Gmail) on behalf of your users.
Prepare your Google Cloud project
Before creating credentials, you need an active Google Cloud project:
- Go to the Google Cloud Console.
- In the upper-left project menu, select New Project (or choose an existing project).
- Enable the required APIs (e.g.,
Google Drive API), via APIs & Services > Library.
Configure OAuth consent screen
Google requires an OAuth consent screen to inform users about the access your app is requesting:
- Go to APIs & Services > OAuth consent screen.
- Choose the User type:
- Internal: only for your Google Workspace team.
- External: For any user with a Google account.
- Click Create and fill in the basic info: App name, User support email, Developer contact email.
- Save and continue. You can skip the Scopes section for initial testing.
Create credentials (Client ID)
With the project ready, you can generate the keys.
- Go to APIs & Services > Credentials.
- Click + CREATE CREDENTIALS and select OAuth client ID.
- Choose the Application type:
- Web application (most common): for websites built with React, Node, PHP, etc.
- Android/iOS: for native mobile apps.
- Desktop app: for command-line tools (CLI) or installable software.
- Set Authorized redirect URIs: this is the URL Google uses to return an authorization code after login.
- Must start with
http://orhttps:// - Cannot contain fragments, relative paths, wildcards, or public IPs.
- Use the following URL:
https://[your-domain].rational.is/api/management/v0/oauth/callback.
- Must start with
Replace [tenant-name] with your own tenant identifier.
Download credentials
- After clicking Create, a pop-up displays your Client ID and Client Secret.
- Click Download JSON to save a local copy containing all the credentials.
The Client Secret is private. Never share it or publish it.
Configure the connector
- Navigate to Settings > Connectors and click + Add.
- Select Google from the provider list.
- Fill out the configuration form:
- Name: for example
Google Drive access for marketing. - Description: optional but strongly recommended for long-term maintenance and team collaboration purposes.
- Client ID: paste the public Client ID from the previous step.
- Client secret: paste the private Client Secret ID from the previous step.
- Name: for example
- Click Add to save and activate the connector.
The Google connector is now ready to define specific data sources, such as Drive folders or BigQuery datasets.
Configure the Google Drive source
- Got to Sources and click + New.
- Complete the source form:
- Name: for example
Marketing team Drive. - Description: optional but strongly recommended for long-term maintenance and team collaboration purposes.
- Source type: select Google Drive
- Select the connector created in the previous step.
- Name: for example
- Browse the accessible Google Drive structure and choose the specific folders, shared Drives, or individual files to sync.
- Click Add to create the source.
This source, like all sources, is created with manual synchronization by default. Check the Synchronization settings section to learn how to update them.
Integrate OpenRouter data
This procedure allows your application to access OpenRouter endpoints using API keys, enabling Rational AI to interact with OpenRouter models and data.
Generate API key
- Log In: visit OpenRouter and login with your account, or create a new one if you don't have one already (use email, Google, or GitHub).
- Click your profile icon and select Keys.
- Click Create API Key:
- Provide a recognizable name to track its usage.
- Optionally define a credit limit to manage spending and/or an expiration date for the key.
- Immediately copy the generated key (starting with
sk-or-v1-). You will not be able to see it again after leaving the page.
Treat your API key like a password. Never share it publicly or commit it to repositories.
Configure the connector
- Navigate to Settings > Connectors and click + Add.
- Select OpenRouter from the provider list.
- Fill out the configuration form:
- Name: for example
OpenRouter access for marketing. - Description: optional but strongly recommended for long-term maintenance and team collaboration purposes.
- API key: paste the key you generated in the previous step.
- Name: for example
- Click Add to save and activate the connector.
The OpenRouter connector is now ready to define specific resources, such as model endpoints or datasets.
Configure the OpenRouter source
- Got to Sources and click + New.
- Complete the source form:
- Name: for example
Marketing AI Models. - Description: optional but strongly recommended for long-term maintenance and team collaboration purposes.
- Source type: select OpenRouter
- Select the connector created in the previous step.
- Name: for example
- Click Add to create the source.